
Over my decade of Revit work there have been so many times I tried and failed to find a way to bring clean and usable Rhino geometry into Revit. Slowly, like multiple years slowly, some great solutions have emerged from digital innovators like Nathan Miller at Proving Ground with Rhynamo and the LMN tech studio with my personal favorite, Lyrebird. Even the developers at Autodesk and McNeel have started to work towards interoperability, with Rhino geometry now an importable file type (it’s still dead geometry for the most part) for Revit, and the exciting news that Rhino 7 will potentially be able to run inside Revit itself as a plugin. This is all great, but what if you don’t know Rhino and don’t have the time to learn? What if you are a Revit expert and simply want to figure out how to do some complex modeling in the software you are comfortable in?
This is not a Holy Grail article that is going to help you use Revit exactly like Rhino. It is however an article to discuss some quick and easy ways to create geometry in Revit that is more complicated than what most people are used to, such as double curvature surfaces. Full disclaimer, I am not a Rhino power user. I use it primarily to generate things through Grasshopper, of which I am a power user. I know there are some wild ways you can use Rhino, but as an Architect building relatively typical projects there are definitely limits. This tutorial is going to go into some advanced ways to use Revit more like Rhino but may not get all the way there for people who are Rhino experts. If you didn’t get your Rhino for Revit questions answered here, please let me know and I’ll investigate for a future post.
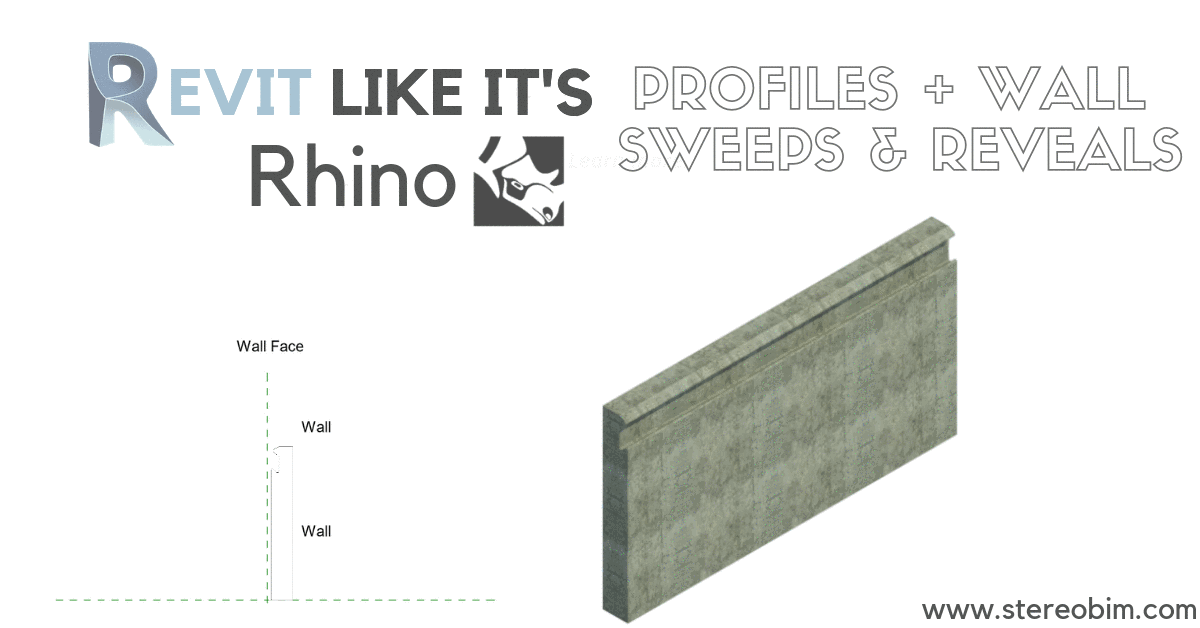
1. Profiles + Wall Sweeps/Reveals
Profiles seem so simple and harmless, just 2-D families you drop into Revit and often forget all about. Used correctly they can have a significant effect on upgrading the detail level of your project. The simplest examples would be trim and moldings. If you want to create a solid concrete wall that doubles as a grab rail or a nook in a living room with a custom back bench built into the wall, using Wall Reveal is a great way to do this. Be careful though, because Revit is still Revit, and I have found if you get too carried away with the size of a specific reveal, say something like five feet, it will start cutting into other nearby walls without you actually asking. At this point things will get a bit too complicated and you may want to look into Wall Hosted Families instead. There are a number of benefits to Wall Hosted Families—for instance if you are doing something that is not uniform in section the way crown molding is–and you can create them as voids or extrusions as well. I plan to go deeper into how you can leverage wall-based voids for precast panels in a future post, as it is a much more specified and advanced method. Do you have a Revit issue specifically related to precast panels you are working on? Let me know and I’ll try to cover it in that advanced post.
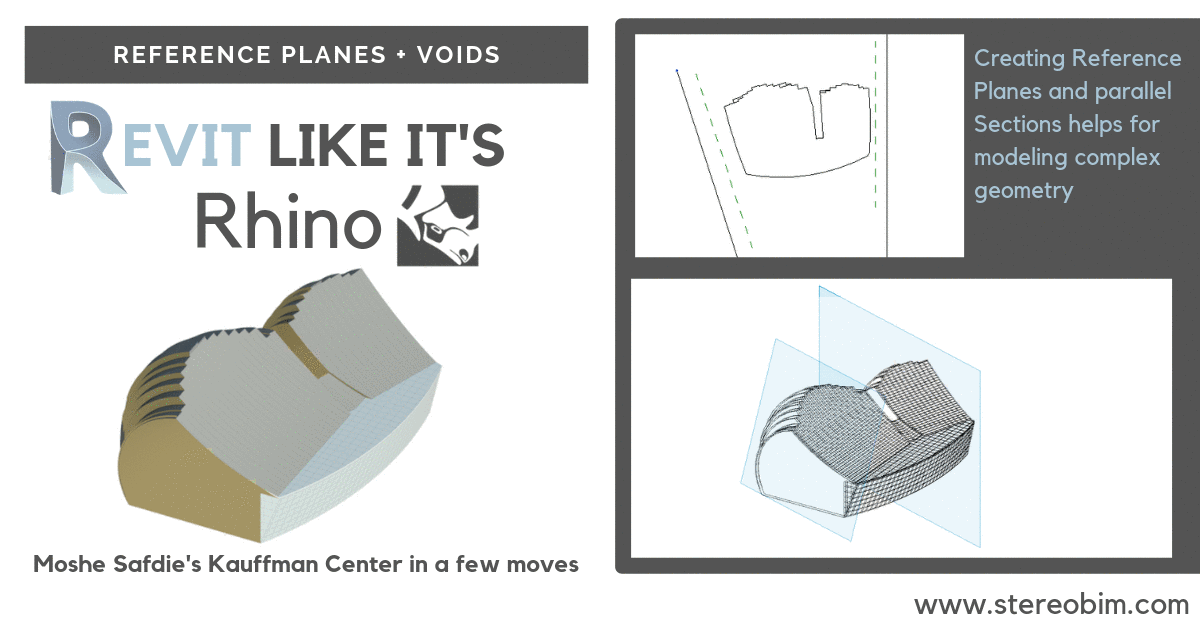
2. Model In-Place + Reference Planes
In a previous post we talked about how Voids coupled with Solids can start to create complex geometry in Revit. Well, once you start getting into blends and sweeps you can make even more complex things, but you are also going to start running into the issue of Reference Planes a lot more. Reference Planes can be a bit of a headache if you don’t think strategically about them beforehand. In Revit, everything has a reference plane, and when you initially get started modeling something in place your reference plane is likely set to a Level, which is one kind of reference plane. If you are trying to do things in section, such as a profile of a sweep, it would benefit you to draw a section before you start Model In-place, and then put a Reference Plane parallel to that section. Now when you go to model in place, you can select Set Work Plane and when it asks you to specify a new work plane, either select the section you just created in the drop down menu or choose Pick a Plane and select it in a view it is visible in (probably a Plan View). You now have a perfectly aligned work plane to create your profile. If you want a quicker approach you can use the work plane viewer, which creates a parallel view of your workplane, but I find this tool to be a bit clunky and it doesn’t solve the problem of actually creating a new work plane. Also you can select faces of elements in your model to set as the work plane, but again it does not guarantee the plane is aligned the way you wish.
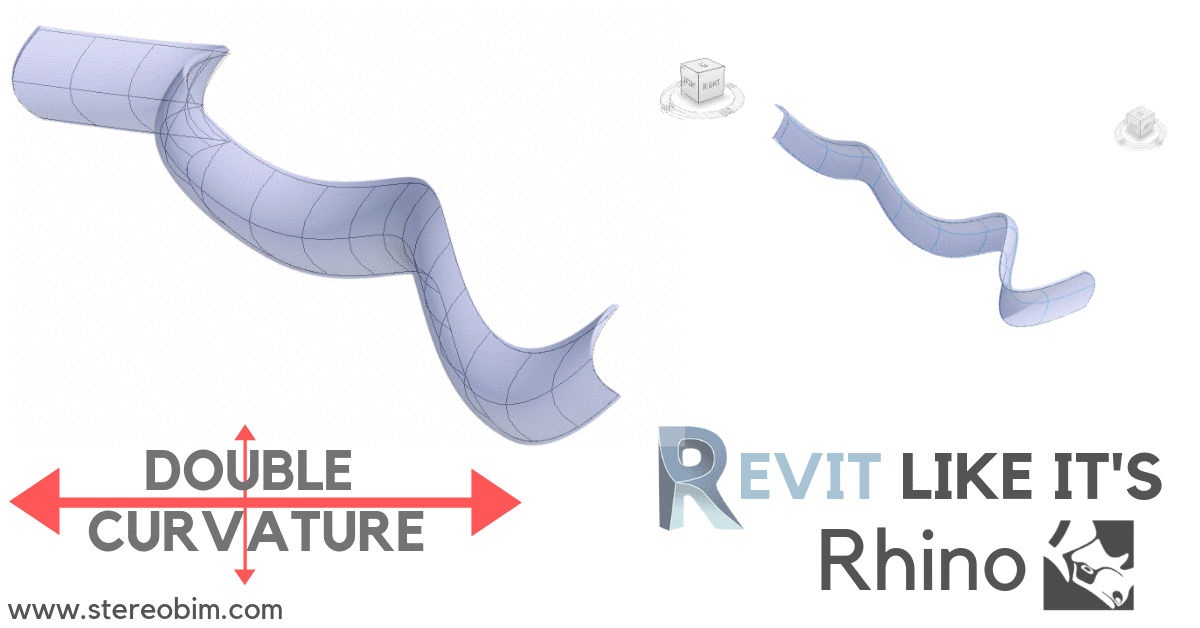
3. In-Place Mass - Splines through Points + Reference Planes
Revit is definitely more finicky than Rhino, but it is also logical about how it thinks of complex shapes. It is thinking as a builder, not a sculptor, which can be frustrating for all you sculptors out there. In a previous post I talked about how controlled views are a great way to conceptualize your design. Well, let’s do the same thing in the context of a double-curved surface. If our goal is to make something buildable, it’s certainly not going to hurt to think about our surface in a rational way. Let’s use the example of a double-curved wall. The reality is that in Architecture, when we are talking about double curvature we are often talking about roofs or walls. We are not making the next Pixar movie here, we are finding a way to document a building that is possible to build. If we think about double curvature, what’s happening is that it is curving in both plan and section. If we understand how it is going to curve in plan, and how it is going to curve in section, it’s not that hard to generate in Revit. You start with perpendicular Reference Planes in plan (like we just talked about!) and you can use either a Level or create a new Reference Plane in section. Levels work fine as long as they align with where you want to place things. Now you will want to use In-Place Mass and use the Points Element (it’s in the regular drawing box with all the lines, only in this type of modeling environment though) and layout all the points in plan. I would suggest overdoing it on points so it is accurate, or else the final spline we will draw is not going to come out as clean as you’d like. Once you have all the points drawn in plan, go to the section. Select the points and move them up or down so they are in the correct place in section. Now, go into a 3-D view and use the Spline through Points, drawing the spline through each point. Now copy the spline, and paste it to the same place, then move the copy in a controlled view. Do one more and move it in between the first two splines in a controlled view and in both the XY and Z directions. Now you can join the three to create a double curved surface. If Revit keeps giving you an error, think about breaking your wall into smaller parts before creating a surface. Once you have your surface, you can reference that surface to create walls, floors and roofs using the In-Place Mass tool. If that doesn’t work, try creating a thinner wall, floor or roof and see if it that helps. If you have a crazy shape sometimes it will not respond well to a thicker wall, such as 12”.
Hopefully the next time you come up with a crazy napkin sketch and want to bring it to life in Revit you’ll be able to get a bit further than before. Remember, it’s still Revit and not Rhino, so don’t get too discouraged if your first few attempts don’t work. If you still are having trouble after reading this post, or have any suggestions or things you want explained that I missed here, let me know and I will try to get to them in a future post.